Monday, April 5, 2021

Classroom Standing Desk: Delivered!

 We've written on this blog about the completion, delivery, and feedback for PathPoint's wheelchair computer desk, but what about the other project intended for Mrs. Jones? We're glad to report that this project has now been constructed, assembled, and painted according to the student plans and delivered to a grateful 4th grade teacher!

Like all of our COVID-friendly projects this year, the design work was done by students: Alan, Davis, Eliana, Isaiah, Kaitlyn, Kassy, Sam, Zach, and Pedro. Their original concepts were submitted as sketches and miniature models back in October 2020.

Alan's early LEGO concept (October 2020)

Mrs. Jones reviewed these concepts and filtered out the ones that were less suitable. The result of this, plus another online design charrette, was a series of simple sketches and a collaborative CAD model in Onshape, which can be accessed here.

The result of a design charrette in December 2020

The final collaborative CAD model emerges

Mr. Meadth acted as fabricator for this project, with Zach in 11th grade contributing a beautiful hand-finished red oak table surface. Angel, while not an actual member of this project, worked after school to attach caster wheels and paint according to Mrs. Jones' requested color scheme.

The linear actuator motor, intended as a replacement for an
armchair recliner and capable of over 150 lb of force

The actuator is sandwiched between
two pieces of plywood

Zach's table surface attached and
actuator extended

In retracted position


From the very beginning, these mechanical furniture designs needed to closely follow the advice given over two thousand years ago by the Roman architect, Vitruvius. Vitruvius was primarily concerned with buildings for home and public use, but his timeless principles seem to fit this project particularly well: firmitas, utilitas, venustas. Translated as "strength, utility, beauty", this triad neatly underscores the challenges and requirements of Mrs. Jones' desk.

Strength: Can a desk be put on wheels and still be stable and secure? How can you design a desk that changes its size and shape without risking damage to users and their property (like a laptop that slips off and smashes!)? When will a cantilever design be so audacious as to become a tipping hazard?

Utility: What features are necessary and useful for any teacher? How to incorporate a maximum amount of storage while allowing room for the electrical mechanism? What are the exact heights that Mrs. Jones requires for her sitting and standing? How much desk space is enough?

Beauty: How do you hide away the necessary mechanical equipment? What should be the focal point of this design to catch the eye? What color and trim will best fit a classroom and suit the client?

Carving out a shallow hole for the wooden handle

The wooden handle structure ready for installation
(note the dowels and holes)

A strap clamp to secure the handle while gluing


Angel attaches the caster wheels

The rubber stoppers are screwed into place after painting

With the door and shelving installed, this is ready for delivery!

In March 2021, after six months of work, it was finally time to deliver the finished product. With the help of Mr. Knoles, the Lower School Principal, Mr. Meadth surprised the entire class one morning with the desk delivery. Mrs. Jones was delighted to receive the desk, and promptly filled it with her hefty teacher editions—which definitely helped as a counterbalance to the cantilever design!

The crew proudly presents their product!

Mr. Meadth surprises Mrs. Jones with the
finished desk!

"So I just press here...?"

Loaded up and ready to go in 4th grade


This project shows us once again that engineers, mathematicians, scientists, and technologists are uniquely poised to love those around them. As we often discuss in the Providence Engineering Academy, it is only those with a particular type of training and set of skills who can turn good intentions into deliverable outcomes. To quote Christian philosopher Etienne Gilson, "piety is no substitute for technique."

Thank you, Mrs. Jones for allowing us to partner with you in such an interesting project this year. It was an admirable test of the students' skills as they sketched concepts, designed CAD models, collaborated interactively, calculated forces and moments, and put saw to wood. Well done to each student who contributed—you are accomplishing great things.


Update: Wheelchair Computer Desk Feedback

 Back in February, we posted a blog describing the completion and delivery of our wheelchair computer desk to PathPoint. After a few weeks, we were finally able to get Mr. Meadth and Mr. Gil Addison together with his team to go over the design and get that long-awaited feedback.

Feedback from the end user is critical to the entire design process. For this particular project, the Academy had all sorts of unanswered questions: will the design function as requested? Does the screen angle suit a typical wheelchair user? How convenient is the keyboard position? Is the mechanical motion safe enough for general usage? Would a typical PathPoint resident be able to operate the remote control? What improvements could be made? While we don't currently plan on producing a Mk II, one project often leads into another and we improve our products by understanding their strengths and weaknesses.

Gil Addison (far right) together with his grateful staff

Mr. Meadth (center) joins in for the camera

Gil met Mr. Meadth together with six of the PathPoint staff members and together they went over the particulars of the design. You can watch the entire footage here, and a summary of design points is also included below.


As we draw this project to a close, thank you to PathPoint for being willing to work with us in an ongoing fashion! May our students always be inspired to use their God-given gifts with training and understanding, and we hope that the PathPoint residents are blessed through this simple gift.


Thursday, February 18, 2021

Wheelchair Computer Desk: Delivered!

 Following on from our last post, we'd like to provide an update: the custom computer desk for Gil Addison at PathPoint was recently delivered, bringing that particular project to a close. This desk raises up and down to any given height using an electrically driven linear actuator. The wheelchair user carries the remote control key fob, allowing complete adjustment from near or far. The desk is intentionally designed to tip the computer forwards to face down towards the user, as many wheelchairs seat the occupant in a reclined position.

You can play with the online CAD model here.

At the time of this writing, we are still waiting for feedback on the end result and photos of the desk in action. But in the meanwhile, enjoy some photos of the students as they put together the final product and examined the results. Thank you, Gil, for helping us execute such a meaningful project!

The final product assembled in the workshop, after some
final modifications. The actuator placement had to be changed
in order to create more torque to lift the table.


After disassembly, Nolan (senior) set to
work applying the protective oil to the
upper table surface

Abby (freshman) oils the lower base piece

After all pieces were oiled, Angel (sophomore) reassembled
the entire structure together with Mr. Meadth

A few more bolts to go--almost there!

The finished product as attached to a typical household
table, keyboard shown

The finished product in the full lowered position

Teleios, Hunter, and Abby (freshmen) get their first
look at the end result on the day of delivery

Joshua and Nolan (seniors) test out the remote control

The whole team from left to right: Hans, Abby, Hunter,
Teleios, Mr. Meadth, Angel, Joshua, and Nolan
(James was also in this group); note an iMac computer
attached as per intended use


Friday, January 29, 2021

Service Project: Mechanical Furniture

Freshmen Hans and Hunter, tools out

Even in the midst of a global pandemic, the Providence Engineering Academy follows a particular philosophy that transcends circumstances. While many robotics clubs and engineering programs might teach physics, maker skills, CAD, and more, we believe that these elements—fascinating as they may be—are only the means to an end. In the latest application form for the coming year, there are six "big ideas" listed; Big Idea Number 1 is that service matters:

As Christians, we have an obligation to turn our skills outward to the world around us; we learn not for our own sakes.
While we may not be allowed to mix cohorts or share equipment, the seventeen dedicated upper school students are committed to loving their community using their math, physics, coding, CAD, robotics, and maker skills.

Early on in the school year, we found two willing partners in this process: one was Mr. Gil Addison of PathPoint, an organization serving at-home and on-site residents, many of whom use a wheelchair each day due to their limited mobility. The other was Mrs. Christa Jones, 4th Grade teacher in the Providence Lower School. Both of these clients had distinct requests for custom-made furniture and it was the perfect opportunity for our students to put their new-found statics knowledge to the test (statics is the study of physically balanced situations where the net force is zero, such as buildings and bridges).

Mrs. Christa Jones, 4th Grade Providence Teacher

Mr. Gil Addison, PathPoint

Mr. Addison wanted a custom-made desk for an iMac computer that could be set to a lower height for a wheelchair occupant, and then back up to a standing desk height for an ambulatory user. Such a desk is hard to find in the current marketplace, and the engineering students saw an opportunity to provide something uniquely useful. The desk would be mechanically driven by a remote control, safe for an individual with limited dexterity, and functional to hold the computer at any height without concern.

By contrast, Mrs. Jones needed a new teaching desk at the front of her room to help meet the new style of a COVID year. This mobile desk would need to be equally useful in a standing or sitting position, for maximum versatility with her in-person and at-home students.

How to meet the needs of these clients in a year when the Engineering Academy is functioning in an independent-learning mode? How could we hold a meaningful design charrette when mixing between cohorts is prohibited? How can seventeen students come up with an agreed-upon detailed design and communicate it with the clients?

Answer: with creativity, technological tools, and a great attitude!

The students began by watching pre-recorded videos from the clients as they described their requests and necessary constraints to Mr. Meadth, the Academy Director. Mr. Meadth offered up some quick sketches and ideas in the videos to help sort through what would and wouldn't work.

Early notes for Christa Jones' project

Early notes for Gil Addison's project

The students then used LEGO and other construction materials to make quick miniature mock-ups of their ideas, along with sketches to help show functionality. The images were sent to the clients to help them think through the possible solutions at hand. Another round of recorded video reviews with the clients, and then the real design work began!

Alan's rolling cart concept

Kaitlyn's desk concept with extendable platforms

Together with Mr. Meadth, the students worked together over Zoom and in their grade level cohorts, using the cloud-based CAD tools from Onshape. With each student taking ownership of several parts from the whole, they worked collaboratively to produce something that could be presented back to client as a visualization and to the fabricator as dimensioned drawings. Teleios in 9th Grade can create the top part of the desk, Angel in 10th Grade can make the support struts, and Nolan in 12th Grade can design the platform for the keyboard. All team members can see how the pieces fit together in advance, spotting potential problems before a single cut is made. This kind of ease, speed, and confidence in the design process simply did not exist even five years ago, and we are glad for it!

(The computer desk for Mr. Addison can be viewed live here, and the rolling cabinet for Mrs. Jones here. Both models are interactive.)

Mrs. Jones' rolling cart CAD model

Mr. Addison's adjustable computer desk CAD model

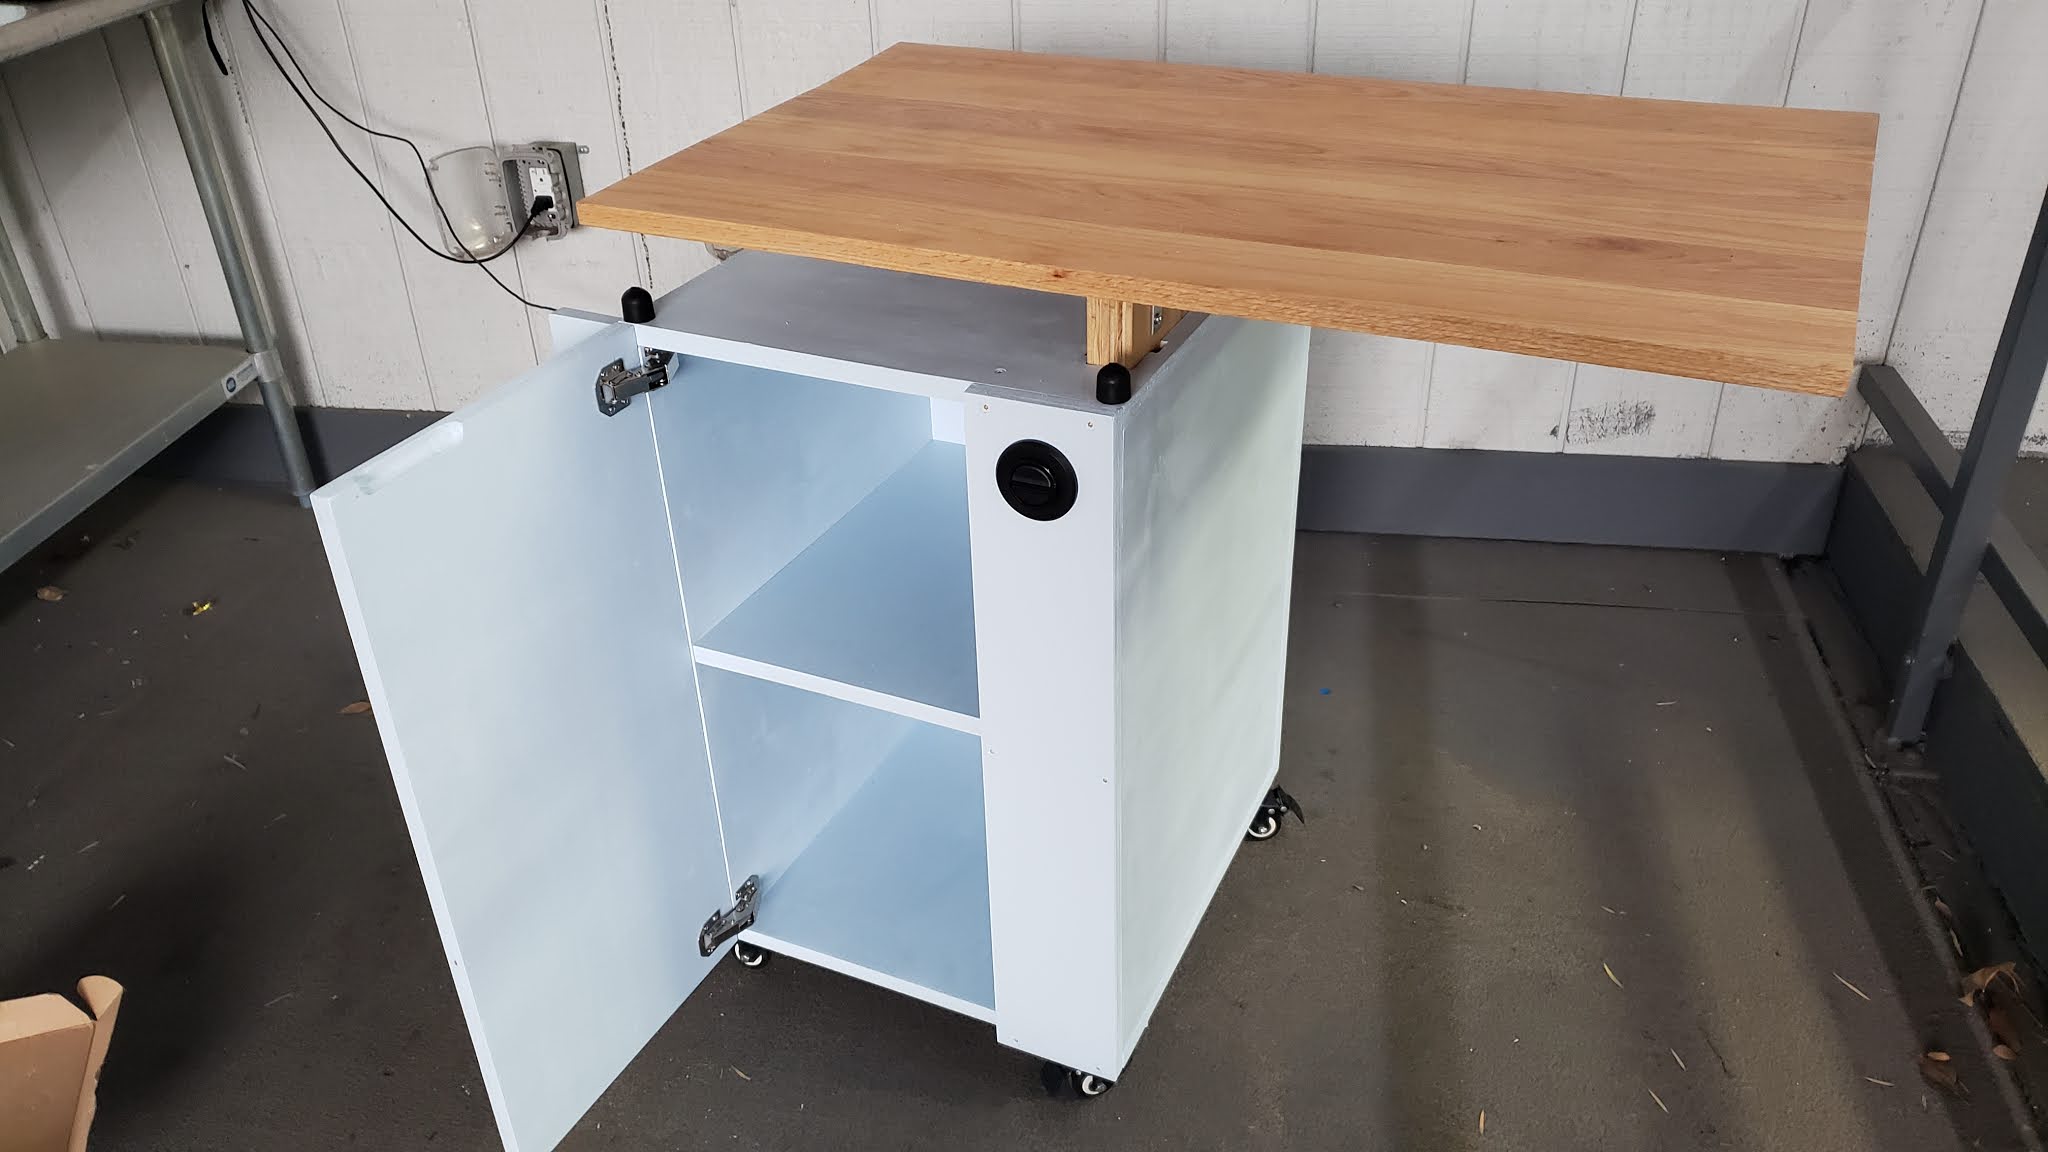
So where are we today? After purchasing the plywood, oak, mechanical actuators, caster wheels, and other bits and pieces, fabrication is underway. The clients are now eagerly awaiting the delivery of their prototypes. Gil Addison's computer desk is nearly complete at the time of this article, and Zach in 11th Grade has put together a beautiful biscuit-joined red oak desk surface for Mrs. Jones' rolling cabinet.

James assembles the clamping mechanism for Gil's design

Teleios and Abby show off the parallel linkages

Nolan with the mechanical actuator

The vision nears reality for PathPoint!

Zach's red oak table surface (3 ft long)

We'll update this blog site as the projects are completed and delivered. For now, we're just glad to be able to continue our exciting mission through a pandemic and out the other side. The exhortation in I Peter Chapter 4 seems particularly apt:

Each of you should use whatever gift you have received to serve others, as faithful stewards of God’s grace in its various forms. If anyone speaks, they should do so as one who speaks the very words of God. If anyone serves, they should do so with the strength God provides, so that in all things God may be praised through Jesus Christ.

Keep on serving with the strength God provides, engineering students! You're making us all very proud. 

Friday, October 30, 2020

Physics, Freshmen, Furniture... and a Grant Win!

There hasn't been a lot of action on this blog site so far this school year—but not because there aren't things worth writing home about! As you can imagine, I (Mr. Meadth) have been much busier on the ground each day with cleaning and supervision, let alone teaching the engineering class.

But some things are worth documenting and celebrating. So let's jump in!

1. Four New Freshmen

We took four new engineering students into the freshman class. A big welcome to Hunter, Abby, Teleios, and Eliana. These junior engineers are hitting the ground running, despite all the challenges. They are learning trigonometry before their time, taking baby steps into the world of computer-aided design (CAD), and just generally being awesome. Welcome, freshmen!

Hunter, Teleios, and Abby (Eliana couldn't make this
photo, but she's just as much a part of this group!)

2. College-Level Statics... From a Textbook

Despite my propensity to always design my own curriculum from the ground up, I tried something new this year: a textbook! It turns out this was the perfect year in which to do this, as it matched well to the statics studies that we've always done anyway. Don't be led astray by the name—Statics for Dummies—the lighthearted tone helps high schoolers get through those pesky equations. For those engineering parents out there, you'll find all of the fun you can handle in vector calculations, force couples, and free-body diagrams.


3. Independent Mode

This is a grand experiment, and one that we committed to from the start of the year. Can we commit to a full year of engineering studies in independent mode? Some would say that it's never been tried, but this is the year to come up with new solutions! Despite the absence of stimulating classroom discussions, this has allowed students to take seven classes plus engineering, and it allows students to watch at their own pace. Students have watched 18 videos so far this year, and responded with written assignments and discussion boards. They are now eagerly discussing their community design project in a shared Google Doc, which brings us to Number 4...

Acceleration sums in three dimension, anyone?
If you can't find the centroid of a composite area,
you just can't call yourself an engineer

4. Community Design Project

I'm so happy with how this project is rolling forward! We have two "clients", Mrs. Christa Jones on the San Roque campus and Mr. Gil Addison at PathPoint, who works with residents in wheelchairs. Our student teams are busily designing an adjustable standing desk for Mrs. Jones and an adjustable computer desk for Mr. Addison. Both of these designs are required to involve electrical/mechanical aspects, such as motorized lifts or built-in LED lighting. Once the student teams finalize their designs, complete with drawings and CAD models, I (Mr. Meadth) will be building their designs myself—in the interest of staying as contact-less as possible.


5. Lots of Publicity

We've received a surprising amount of national-level publicity lately. Our students use the CAD platform Onshape, and Onshape reached out to us to record a video and write a blog article. The video has been up for a over a month now, and the blog article will be published soon. Our Academy was also mentioned in another national publication by the American Institute of Aviation and Aeronautics (AIAA), Aerospace America, because we won a $500 grant to help build our remote-controlled aircraft.


6. Major Grant Win

Is it just me that believes in our outstanding Providence engineering program? Is it just the university lecturers who receive our already-highly-trained students? Am I just blowing my own horn over here? Apparently not! The Toshiba America Foundation decided that our second-semester robotics project was something worth funding, and we are pleased to announce that over $4,000 of the very latest in classroom robotics equipment will soon be arriving on campus. This will be put to use in our Mars Rover project, where different student teams will design, build, and code different components of one big vehicle. I'm looking forward to this one. Thanks, Toshiba!

One of the advanced Vex V5 sets: coming soon!

As always, stay posted for more exciting announcements. Our junior engineers are doing something very different, but making the most of it. I'm confident that their skills and experience will remain at the very highest level amongst similar programs in our area. Keep it up, students!

--Mr. Meadth


Monday, July 27, 2020

Designed, Built, Flown!

You can't choose the hand you're dealt, but you can play it to win every time.

Along with every one else around the globe, the Providence Engineering Academy was dealt a tough hand in March. Having worked so hard in the lead-up to the major capstone project—to design, build, and fly a powered tethered aircraft—being asked to complete the project from home was not the situation that anyone wanted. But in the spirit of problem-solving, our junior and senior engineers faced up to the challenge. After all, what is engineering all about if not solving problems?

Our last post on this project ended with the four teams designing various aircraft components using professional-grade CAD software. They had sent their designs to Mr. Meadth, who began to 3D print their fuselages and tails, cut their carbon fiber, and CNC mill their wooden wing ribs, all from the comfort (?) of his garage.

The garage workshop: where the magic happens!

Over the course of several weeks, each team's delivery bag in the garage began to pile higher and higher with these manufactured components, along with advanced electric motors, lightweight lithium batteries, tissue paper, and other bits and pieces. Every last one of these components had been accounted for in duplicate: in a virtual CAD model and a complex spreadsheet. The CAD model held the actual design for manufacture, visualization, assembly guarantee, and mass/center-of-gravity prediction. The spreadsheet calculated wing and tail lift, which in turn yielded a force and moment balance, and also a redundant center-of-gravity prediction. (Redundancy is not a negative word in aircraft engineering!)

Quick science lesson: the center of gravity (c.g.) is where the sum of all weight is located. In other words, it's the point at which you could balance the aircraft on your finger, or where you could hang it from a string. It is determined by the masses and locations of the individual components, and it was critical that our uncontrolled aircraft had the center of gravity forward of the wing's lift force. Without going into the deeper explanation, having the center of gravity as close to the nose as possible means that the aircraft will be self-correcting and stable as it flies. Try attaching a paperclip to the nose of your next paper aircraft and note the dramatic improvement! This is why we ran two separate c.g. calculations using two different method—we wanted to absolutely confirm before manufacture.

Fresh off the printer, ready for delivery!

Sam and Josh work on RUBYGEM, papering and
doping the wings

Mr. Meadth delivered each team's bag directly to their respective homes. Upon arrival, each team worked hard to assemble the aircraft. This involved inserting carbon fiber spars into 3D printed wing boxes, stringing the wooden ribs evenly along the spars, covering the ribs with tissue paper, and then applying dope (a kind of water-based glue) to the paper. The doped paper dries and hardens into a kind of thin shell. The various electronics components were also connected and secured, along with the tail and undercarriage (landing gear).

At the same time, the simple tethering system had to be designed and implemented. The wooden stand sits in the middle of the flight path, and a 3D printed bearing served as an anchor point for the tether line. The tether was then attached to the wingtip. Some of the aircraft needed a little more rigging to ensure that the centripetal force didn't rip the wingtip loose!

Fast forward to the big day. Mr. Meadth made a final decision to hold the test flights in the gym, instead of outside. The smooth floor would take one more variable out of the equation, and the enclosed space would keep out any stray gusts. When your plane only weighs about 2 pounds and floats on the breeze, a gentle wind can be your worst enemy!

Thanos steps on to the court!

First up to the plate was Nolan and Pedro. Their purple and grey monoplane had a planned weight of 800 grams (less than a liter of water). The wingspan was a fairly standard 1.06 meters (a bit more than 3 ft), with a conventional tail style and taildragger undercarriage. Mr. Meadth tied their aircraft to the tether as the excitement mounted, and Pedro took the first turn at the controls. A gentle increase on the electronic throttle, and the affectionately named Thanos rose up beautifully into the air! Nolan took a turn as well, and the team scored two successful take-offs and two successful landings—the ideal outcome!

Plan view of Thanos, taken from the CAD model


Next up was Madison and Alena. Their Airplane Baby was ready to take its first steps, with Alena at the helm. In various shades of baby blue, the 540 gram winged wonder stretched out at an impressive 1.2 meter span (about 4 ft). Their wing aspect ratio (the ratio of wingspan to chord length) was a very healthy 12, almost double that of some other teams. But would it fly?

Airplane Baby gets ready to roll!

The girls produced a set of plans for their
written report

Without a doubt! Both Madison and Alena toured the gym in a somewhat rollercoaster fashion, the tether line being stretched to its limit. We estimated just a couple of feet clearance between the aircraft and the walls—enough to make any pilot sweat a little! But after a safe landing, all was well.


And now a little math. Replaying the video, it looks like Airplane Baby took about 3.5 seconds to complete a lap. If the diameter of the circle was about equal to that of the basketball court (50 ft), then the radius of the circle was half that: 25 ft. The speed of the aircraft through the air is equal to distance over time; the circumference of the circle divided by the time to get around that circle.

Circumference = 2π × radius = 157 ft
Speed = distance/time = 157/3.5 = 45 ft/s

This was about 36% faster than their design speed of 33 ft/s, which only goes to show that their stable aircraft design works just as well under a variety of situations. (It may also mean that their wings weren't as effective at generating lift as theorized!)

Sam and Joshua took to the floor after that, with a slender red aircraft tied to the tether: RUBYGEM. With a planned mass of 440 grams (almost exactly one pound), this was the lightest plane on display. Their rectangular wing planform spanned 1.08 meters, and they planned to fly at only 8 meters per second (26 ft/s). A lighter aircraft does not need as much lift to stay in the air, and so for any given wing design, it can fly slower and still generate the force it needs.

RUBYGEM steps out in style


As RUBYGEM gracefully lifted into the air, it was obvious that she indeed favored a slower style of things. Completing each lap in almost 5 seconds, the flight speed can be calculated at 33 ft/s. This is also faster than their design speed, which reinforces the theory that perhaps there is more inefficiency in the design than our theory accounts for. Sounds like real life, all right!

After successful landings, Mr. Meadth made the decision to head outside with the fourth aircraft: Big Wing Boy. And boy, was it big! At over 2 meters (6.5 ft) span, this multi-colored monoplane was just too big to spread its wings indoors. It was also designed to fly a little slower, and was very light for its size: 800 grams.

Big Wing Boy, taken from the design report

There was, however, one significant issue: while the design looked good in the CAD model and spreadsheet, the greater spans and sizes meant the physical attachment of the parts was just that much more difficult. The sheer size tended to stress the wing root joints more, so extra tension lines were strung between wingtips to help hold everything together.

Being outdoors on the grassy field, the decision was also made to give the aircraft a running hand-held start, because the wheels get caught in the grass. Risky? Yes! Mr. Meadth held Big Wing Boy aloft and kicked off his shoes to get the best launch speed possible. Given that an Olympic runner travels at around the 10 m/s mark, finding the necessary design speed of 8 m/s would be a challenge!


Ben cranked the throttle to a healthy roar, and Mr. Meadth began to dash around the circle. With a final push into the air, B.W.B. lifted up into the great blue yonder where he belonged. All seemed well... and then the unthinkable! Video footage analysis confirms that the carbon fiber stick connecting the wings to the tail tore loose from the aerodynamic loads, and no plane can ever do well without that stabilizing influence. This principle was, in fact, one of the central pillars of the second semester!

The moment of horror as the tail comes loose!

The aircraft wanted to perform, but just couldn't remain aloft. It plowed into the grassy field after only a few seconds of genuine flight. A quick repair and a repeat attempt was launched shortly thereafter, but another half-lap was achieved with similar results—with more permanent destruction this time! There was no third flight.

At the end of the day, what did we learn?
  1. Challenges are there to be overcome. The project could have modified to be easier, simpler, more virtual, you name it. But that kind of logic doesn't get you into the history books, and doesn't give the same kind of satisfaction. Greater levels of determination can turn challenges into victory.
  2. Theory is useful, but doesn't account for everything. Math and physics equations and computer simulations are incredibly useful, and with high-level manufacturing can be a very good analogy of the intended outcome. But the fact is that our theoretical calculations didn't account for a great many factors. This makes it all the more important to create robust, stable designs. The aircraft didn't perform exactly as intended, but they did perform in the real world.
  3. Aircraft need firmly attached tails. You may want to check the welds next time you hop on board your next 737.
Congratulations to our eight aircraft engineers, and many blessings on the four seniors, now alumni: Ben, Todd, Alena, and Madison. You have completed something to be proud of!